Why Mumble?
Although the main Platform of the XSF Community is our Discord, during larger gatherings or Operations we will often use Mumble for cleaner, more structured voicecoms.
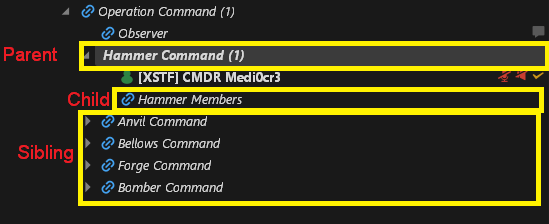
- Allows for dynamic communication system where wing commanders have dedicated communications for their wing, while simultaneously being able to hear the orders from the Operation leader
- Channel structure is all 1 up and 1 down communications between the Parent Channel or Sibling Channel and Child Channel. Essentially, only people in the Child (Hammer Members) channel can hear each other and their Parent channel, which in this example is the Hammer Command of which CMDR Medi0cr3 is in
- Cleaner communications within the Strike Team, ensuring people are not talking over one another from within the wings
- Allows a voice activation for primary communications in wing and an additional key for push-to-talk to reach globally outside of the wing to everyone
- It is a very lightweight free server and client
- Very good audio codecs, easy to setup, and very intuitive
Get on the XSF Mumble Server
Follow the steps to install Mumble and gain access to our Mumble Server.
Download & Install
Visit www.mumble.info to download. Select the version that matches your operating system.
Alternate download link available directly from our website. We are finding out some people are having download issues:
https://github.com/mumble-voip/mumble/releases/download/v1.4.287/mumble_client-1.4.287.x64.msi
Connecting & Registration
Our server is a “private” server and will not show up in the “public server” search. Follow the directions below to connect.
| 1. Click the Globe Icon |  |
| 2. Click the ‘Add New’ button |  |
| 3. Input the following data | * Address: mumble.xenostrikeforce.com * Password (Will be asked after you connect): * Nickname: [XSTF] CMDR YourInGameName The password is in a discord slash command for approved members to see. Utilize /mumble in the #bot-spam channel in the XSF Discord |
| 4. Click “YES” , then ask Staff to get registered | 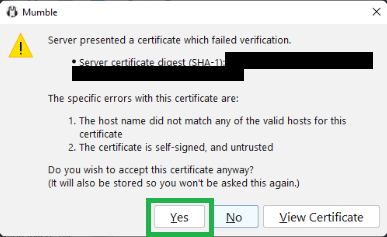 * You will not be asked for the password again after this. * After connecting you will need to get ‘registered’ to be able to move channels, notify a |
| 5. [Recommended] Backup your Certificate | 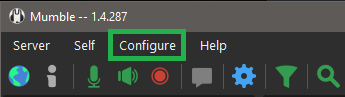 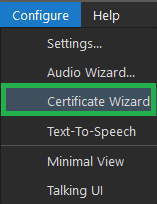 After completing Steps 1-4 we recommend making a Backup of your Certificate. Go to “Configure” on the top of your Mumble application and select “Certificate Wizard” 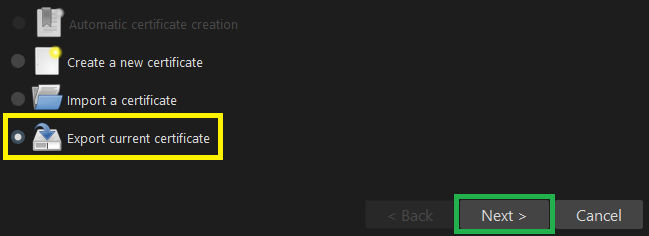 Tick the “Export current certificate” option and then click “Next” |
| 6. Choose Backup Location | 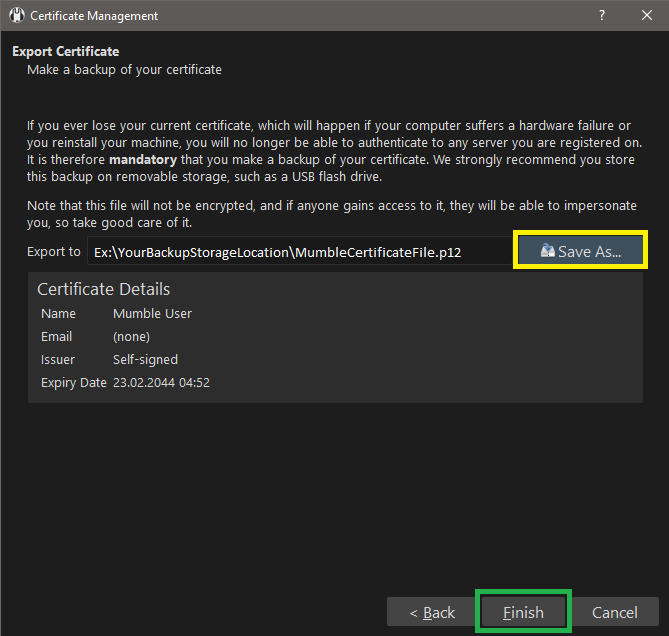 Read the Information Text. Then select Backup Location and File-Name via “Save As…” Click “Finish” when you are done! * If you ever need to make use of your Backup-Certificate; replicate Step 5. but tick the “Import Certificate” option and then select your previously created Backup-File! |
Setup
Please follow the guide as we’ve tested certain settings to ensure people hear each other clearly and concisely. Peoples individual equipment will change. This is not nearly the level of development as Discord as its a very small group of developers that work on the application.
Clicking the Gear ![]() Icon will open the settings.
Icon will open the settings.
Audio Settings
Its important that you determine the correct device if you have specific audio devices doing specific things. Try default. There have been issues reported with bluetooth enabled devices not functioning correctly, information provided as is.
Audio Input & Activation
 Transmission:
Feel free to use voice activation. However we ask that you properly setup your mic detection.
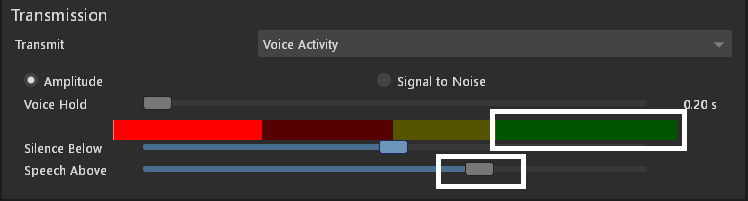
Speech Below Slider:
Setting the ‘Silence Below’ sliding bar will allow you a variable amount of speech. Talking above into the green, past this threshold will count as a ‘voice detection’ and if you suddenly talk softer, falling into this threshold will not count as a new ‘voice activation’. Having a decent gap is preferred.
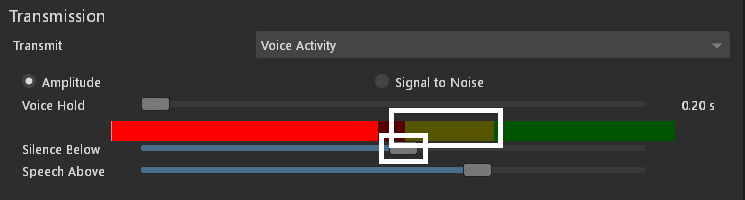
Speech Above Slider:
Setting the ‘Speech Above’ slider simply counts as a voice activation. Simply talk calmly into the mic and adjust as necessary.
Compression:
Select between 120 to 64kbits/sec
Audio per packet 20ms
Audio Processing:
- Max. Amplification 1, unless you have windows mic boost
- Echo Cancellation ‘Mixed Echo Cancellation (speex)’
- Will remove echos of your voice from peoples voices as they talk.
- If you hear yourself while they talk, set to the above setting, otherwise set to default
- Noise suppression. Please enable ‘Both’ with speex suppression strength -31db
Mute Cue:
Disable Mute cue or you will hear beeping while your mic is muted.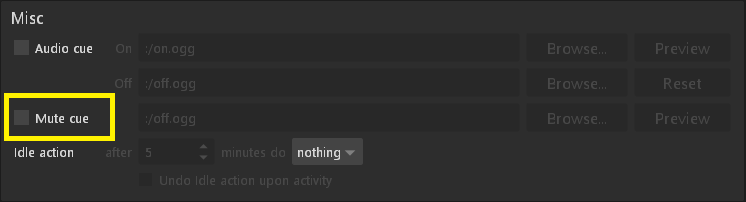
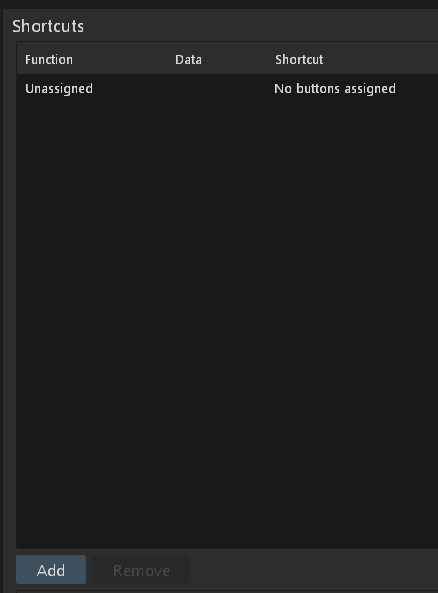
Shortcuts / Hotkeys
This is where you may add keybinds.
Shortcuts for Muting/Deafening, Push-to-talk and Shout/Whisper for example.
Cross-channel Shout
We will now setup the keybind for global talking.
This key will allow you to speak globally outside your channel context. This way you may talk to other sheltered channels in your channel-tree, like from other Wings or Command channels.
In sheltered channels your regular Push-To-Talk or Voice activation will let you talk withint your channel only.
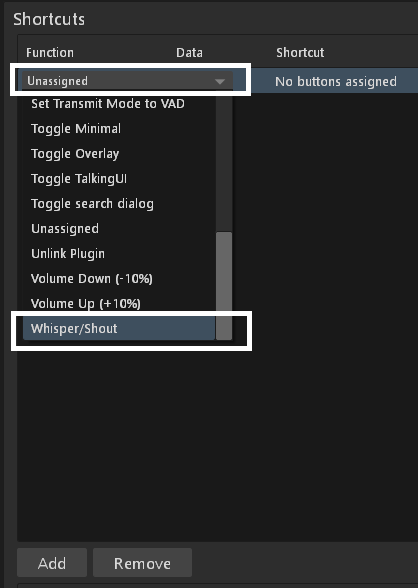
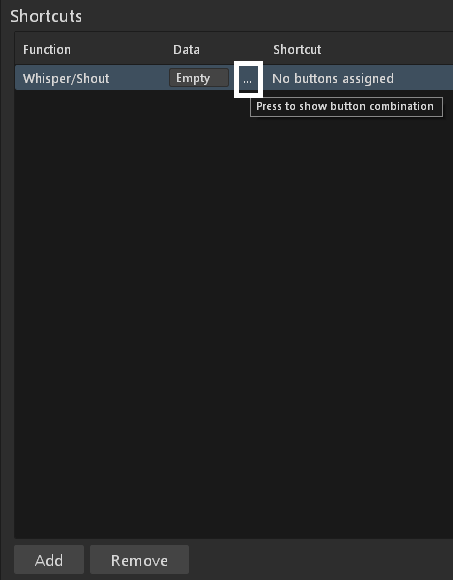
- Click Add
- Under Function – ‘Unassigned’ will populate in the shortcuts field, click on ‘Unassigned’
- A dropdown will appear, you will select ‘whisper/shout’ from the bottom of the drop down.
- Next, click the ‘Data’ field, which should say ‘Emtpy’. Click these three dots to bring up the Whisper Target menu.
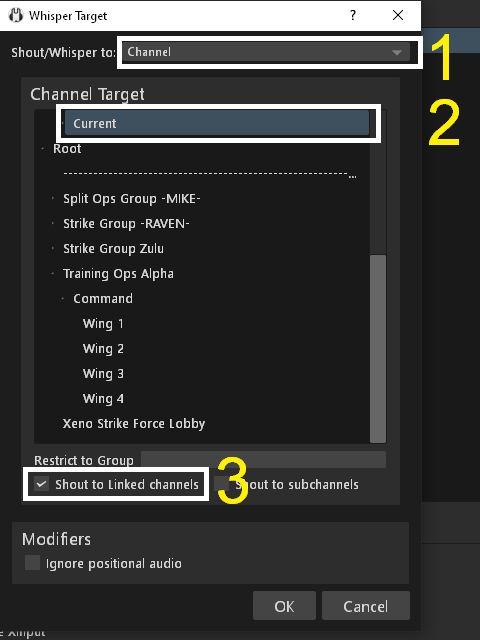
- Select ‘Channel’ in the ‘Shout/Whisper to:’ field and then select ‘Current’ Channel and ‘Shout to Linked Channels’ box.
- Double click on ‘No Buttons Assigned’ to add a key. If you have multiple monitors, a box may popup on your primary display.
- Click Add, then press the key/joystick button you wish. When you click Add it is in ready to record mode.

- Click Add, then press the key/joystick button you wish. When you click Add it is in ready to record mode.
Mute, Deafen, Push-to-Talk and similar
General aproach to make Shortcuts for different functions in mumble.
- Click Add
- Under Function – ‘Unassigned’ will populate in the shortcuts field, click on ‘Unassigned’
- A dropdown will appear, you may select varying functions, whatever you wish to bind.
- Next, click the ‘Data’ field, which should say ‘Emtpy’. You can choose Toggle or on/Off.
- Double click on ‘No Buttons Assigned’ to add a key. If you have multiple monitors, a box may popup on your primary display.
- Click Add, then press the key/joystick button you wish. When you click Add it is in ready to record mode.
- Click Add, then press the key/joystick button you wish. When you click Add it is in ready to record mode.
You are now ready to participate in the Xeno Strike Force Mumble Server!
Customize Mumble’s Look
Mumble is customizable in terms of overal theme, layout, visibility and game-overlay.
User Interface
Layout:
Decide on the layout, can be especiall handy when using on 2nd monitors vertically or in smaller windows.
Look and Feel:
Allows you to select a Theme. Light mode or Dark modes are available here.
Channel Tree:
You can change the way channel trees are shown to you, among channel user visibility and other things.
Overlay
Here you can enable an Overlay and deeply customize the representation and position of channels and Users in it. This can be very convenient to recognize unfamilar voices or just know who is active in the channel during your main-gameplay.