Why Port Forwarding?
Multiplayer activities in Elite: Dangerous are what the Xeno Strike Force is all about.
Unfortunately issues do arise, often caused by the games networking.
Port Forwarding reduces issues with instancing and desyncing in multiplayer scenarios greatly, when set up correctly by every player in the instance.
With Peer to Peer games the players connect directly to each other. One player’s computer sends packets directly to the other player’s computer. Any information about actions from Players in the Instance will have to travel through and inbetween the players’ networks.
What is Port Forwarding?
Port Forwarding is a set of rules for your networking. Communication between the Players works more reliably with them compared to the default uPnP function which is not always supported.
This is essential as Elite: Dangerous uses peer-to-peer networking between Players for all direct Player-interactions , only falling back to Relay servers when necessary – and this can have bad consequences for Instance synchronisation.
Basic Setup
Step-by-Step
Follow the steps below to setup Port Forwarding.
| 0. Ensure UPNP is enabled in Windows | UPNP / Network Discovery should be enabled inside your Windows settings for things here to function properly. Follow the Link below for a step-by-step on how to enable the setting. https://www.computerhope.com/issues/ch001367.htm |
| 1. In the Games Main Menu head to Options > Network Settings |  |
| 2. Navigate to the IPV4 section and turn Port Forwarding ON |  Change the Port Forwarding Setting to ON if it isn’t already. |
| 3. Now select a Port Number |  Note: You can select any number but you MUST select a number explicitly or the setting won’t stick! Note: If you use more than one game-client on the same network, please make sure each client is set to their own specific port. Using the same port across multiple clients will create a routing conflict and break networking for the game. |
| 4. Apply Settings |  Hit the APPLY-button at the bottom of your settings-menu. |
| 5. Quit the game to dekstop | Head back to the Main Menu and click EXIT. |
| 6. Relaunch the Game and confirm settings applied | 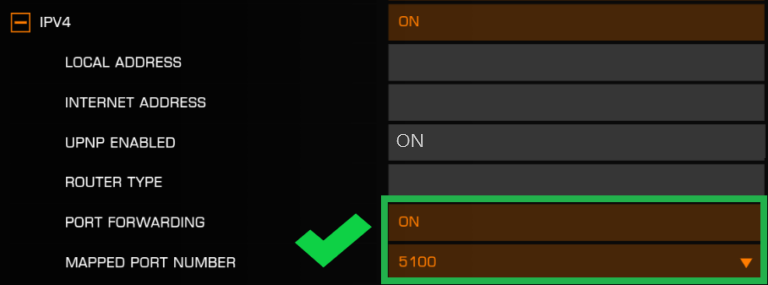 Head into Network-Settings again and confirm that your Port Forwarding Settings remained in place. |
Check
If you successfully went through all the steps above you now want check if it is working.
In-Game-Test
See if the Settings stuck and your game connectivity still works.
- Start the game and enter a Multiplayer Gamemode and meet with another real CMDR in your ships.
- See if you can successfully Instance with one another at a Station or Fleet Carrier, try without Wing first.
- If dirty dropping does not work try again after winging up.
- See if you can successfully Instance with one another at a Station or Fleet Carrier, try without Wing first.
- After successfully instancing please aproach each other.
- Target each other and make sure you see each others ships, not just a ghost signature.
- If you can see and interact with each other; this is a good indicator that your games networking is still working.
- However it is not a guarantee that you can make forwarded connections – the game can fall back to relay mode.
Which would still let you interact but can cause heavy desync during actual combat gameplay.
- However it is not a guarantee that you can make forwarded connections – the game can fall back to relay mode.
Port-Test
You can do this additional test to see for yourself if the desired port is opened when the game is active.
- Start the game and enter a multiplayer Gamemode.
- Press Windows Key + R , type in “cmd” and hit enter.
- Type “netstat -an” into the command prompt and hit enter.
- Check if your selected Port (5100 for example) is visible under the UDP section in the list.
- It would look something like x . x . x . x :5100, the IP of your computer with the port at the end.
If the above was succesfull, in most cases it means you should be DONE with your setup! Your Router should be able to handle the rest.
If you COULD NOT apply the settings or the Check does not work – please have a look at the advanced setup below.
Advanced Setup
Configuring Port Forwarding on your Router
This is more complicated and will require access to your router, but it will be more reliable.
- Make sure your computer has a static IP address assigned, Guide below here:
https://portforward.com/networking/static-ip-windows-10.htm
- Find your Router Model on this Website and check:
https://portforward.com/router.htm
- Follow the steps for opening the port you chose in-game (5100 for example) to your computer.
https://portforward.com/router.htm- Download the Network Utility tool and use it in trial-mode to setup your portforward and to check functionality.
If you have gone through these steps, please restart the game and try the previous Checks once more.
We know not everyone’s circumstances and network-situation allow for this. Some may have a restrictive ISP or no access to their Router.
But we hope you can make it work for an overall more reliable multiplayer-experience in Elite: Dangerous.
Special thanks to CMDR Mgram for his previous posts on Port Forwarding in Elite